¶ Shelly EM as Utility Meter
The Shelly EM should be installed in the home's main electrical panel with a current clamp. Installation of this device is outside the scope of this document.
¶ Connect Shelly to HEMS WIFI
¶ Without the Shelly app
-
On the computer/phone look for WiFi network with SSID like ‘shellyem-XXXX’.
-
Connect to this network (no password should be required).
-
Navigate to 192.168.33.1 in a browser.
-
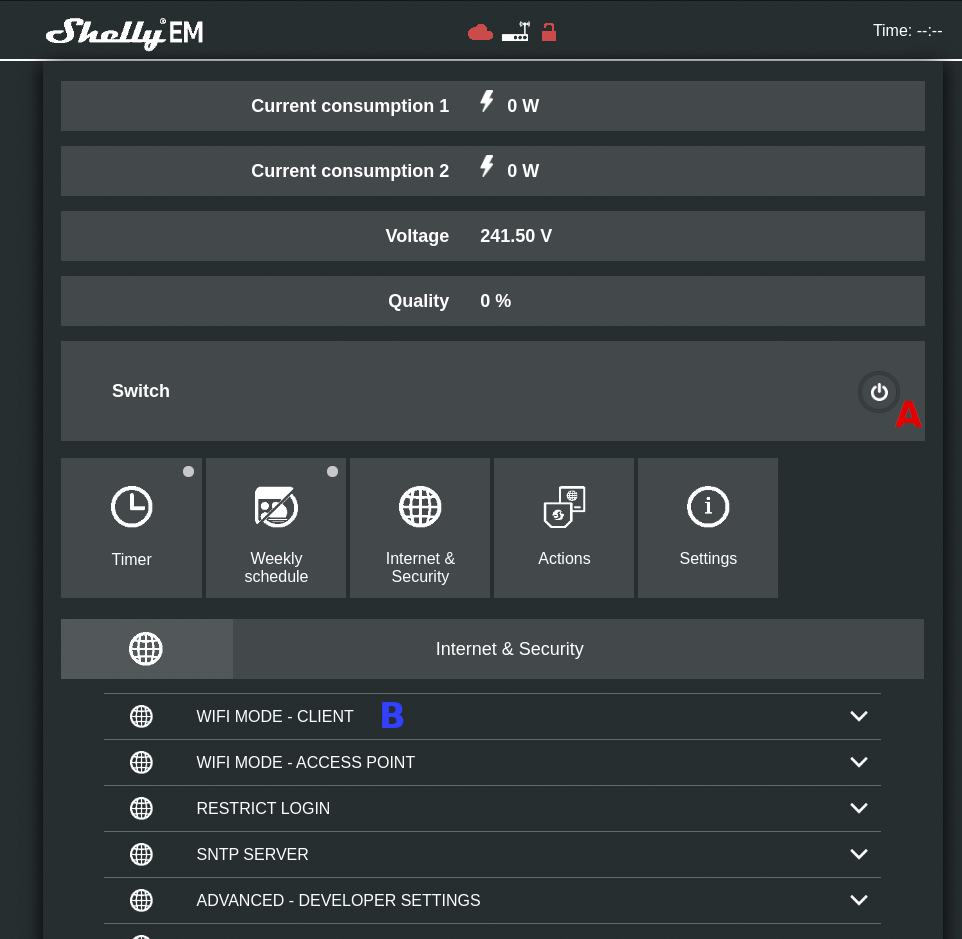
You should see the below screen or similar (can vary based on firmware version)…

Shelly home screen on first use
-
Verify that when you click the switch power icon (indicated with a red A) the relay activates by listening for an audible clunk from the relay.
-
Next, connect the Shelly to the HEMS WiFi network. Click on the ‘WIFI MODE - CLIENT’ drop down (indicated with a red B in the above screenshot).
-
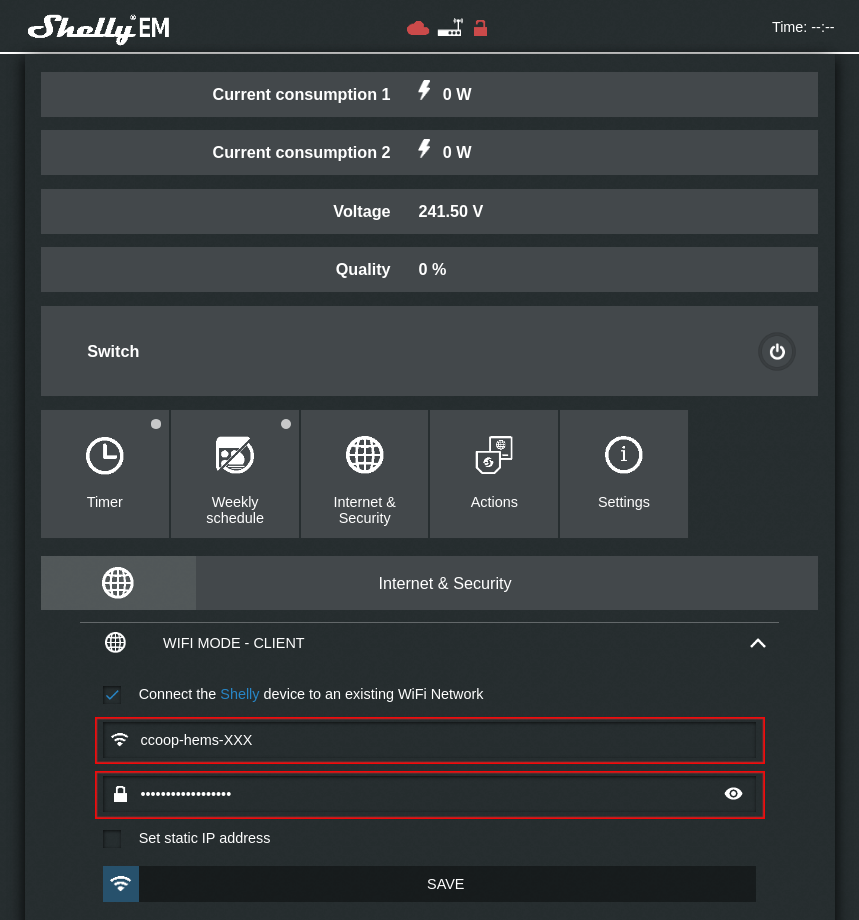
Complete the details for the HEMS WiFi network in the fields highlighted in red below and click SAVE. It is worth ‘revealing’ the password using the eye symbol as a check to verify you have entered it correctly before hitting SAVE.

Shelly config showing WiFi fields
-
Click SAVE.
-
Now reconnect your laptop/phone to the HEMS WiFi network. The controller should have now connected to this network provided the details entered above were correct and the signal strength is sufficient. You now need to determine the IP address of the controller on this network - see below for instructions on this. Navigate to this IP address and confirm that the relay can still be controlled.
¶ With the Shelly app
-
Connect your phone/tablet to the CoFyBox WiFi network
-
Open the Shelly app on your phone/tablet and navigate to Add Device
-
Follow the instructions to add the device to the CoFyBox WiFi network
-
Verify that when you click the switch power icon (indicated with a red A) the relay activates by listening for an audible clunk from the relay.
-
Now reconnect your laptop/phone to the CoFyBox WiFi network. The controller should have now connected to this network provided the details entered above were correct and the signal strength is sufficient. You now need to determine the IP address of the controller on this network - see below for instructions on how to do this. Navigate to this IP address and confirm that the relay can still be controlled.
¶ Find the IP Address of the Shelly
This can be done using a network scanner such as arp-scan or nmap on Linux, or any number of other tools, including mobile apps like Network Discovery for Android or Network Analyzer Lite. Note that we have not tested and are not endorsing these apps! You will need to connect your phone to the CoFyBox WiFi hotspot to use a mobile app.
Using nmap (this command will always be the same as the network of the CoFyBox is fixed):
$ nmap -sP 10.42.0.*
Starting Nmap 7.80 ( https://nmap.org ) at 2020-06-24 17:53 BST
Nmap scan report for 10.42.0.1
Host is up (0.020s latency).
Nmap scan report for shellyem-B9EEAE (10.42.0.23)
Host is up (0.042s latency).
Nmap scan report for 10.42.0.72
Host is up (0.046s latency).
Nmap scan report for minerva (10.42.0.129)
Host is up (0.00041s latency).
Nmap done: 256 IP addresses (4 hosts up) scanned in 12.63 seconds
In the above output you can see the shellyem device is (in this case) IP 10.42.0.23.
¶ Update Firmware on Controller
If a firmware update is available then update the controller via the Shelly’s HTTP interface. It should be finished within 30 seconds. If it takes more than 5 minutes you may have a problem!
¶ Connect Controller to MQTT Broker
-
Using the IP determined in the previous step you should now access the ShellyEM UI again (note that in completing this step you are verifying connectivity of the ShellyEM to the secure network).
-
Click ‘Internet & Security’ > ‘Advanced - Developer Settings’
-
Enable the MQTT mode by ticking the ‘Enable action execution via MQTT’.
-
In the ‘Server’ field enter 10.42.0.1:1883.
The ShellyEM should at this stage have acquired the time automatically through the network and you can verify this by looking in the top-right corner where the current time is displayed. If it is not shown then the Shelly is having an issue acquiring the network time.
¶ Configure Glue Code
Navigate to /configurator at the CoFyBox IP address (http://10.42.0.1/configurator when connected to the CoFyBox WiFi network).
This gives access to the configurator.
Find the glue_keys.yaml file, using the Folder icon in the top left.
The file should look something like this, with the name of the shellyem changed to match yours:
configuration:
  remove_after: 30
ingredients:
  total_consumption:
    friendly_name: "Total energy consumed"
    topic_in: "shellies/shellyem-B9F2CA/emeter/1/total"
  total_injection:
    friendly_name: "Total energy injected"
    topic_in: "shellies/shellyem-B9F2CA/emeter/1/total_returned"
  total_power:
    friendly_name: "Total energy injected"
    topic_in: "shellies/shellyem-B9F2CA/emeter/1/power"
  voltage:
    friendly_name: "Grid voltage"
    topic_in: "shellies/shellyem-B9F2CA/emeter/1/voltage"
recipes:
  total_consumed:
    friendly_name: "Total consumption"
    topic_out: "data/devices/utility_meter/total_energy_consumed"
    recipe: "total_consumption"
    entity: "utility_meter"
    channel: "total_energy_consumed"
    unit: "Wh"
    metricKind: "cumulative"
  total_injected:
    friendly_name: "Total injection"
    topic_out: "data/devices/utility_meter/total_energy_injecteddd"
    recipe: "total_injection"
    entity: "utility_meter"
    channel: "total_energy_injected"
    unit: "Wh"
    metricKind: "cumulative"
  total_power:
    friendly_name: "Total active power"
    topic_out: "data/devices/utility_meter/total_active_power"
    recipe: "total_power"
    entity: "utility_meter"
    channel: "total_active_power"
    unit: "W"
    metricKind: "cumulative"
  voltage_phase_l1:
    friendly_name: "Voltage phase 1"
    topic_out: "data/devices/utility_meter/voltage_phase_l1"
    recipe: "voltage"
    entity: "utility_meter"
    channel: "voltage_phase_l1"
    unit: "V"
    metricKind: "gauge"
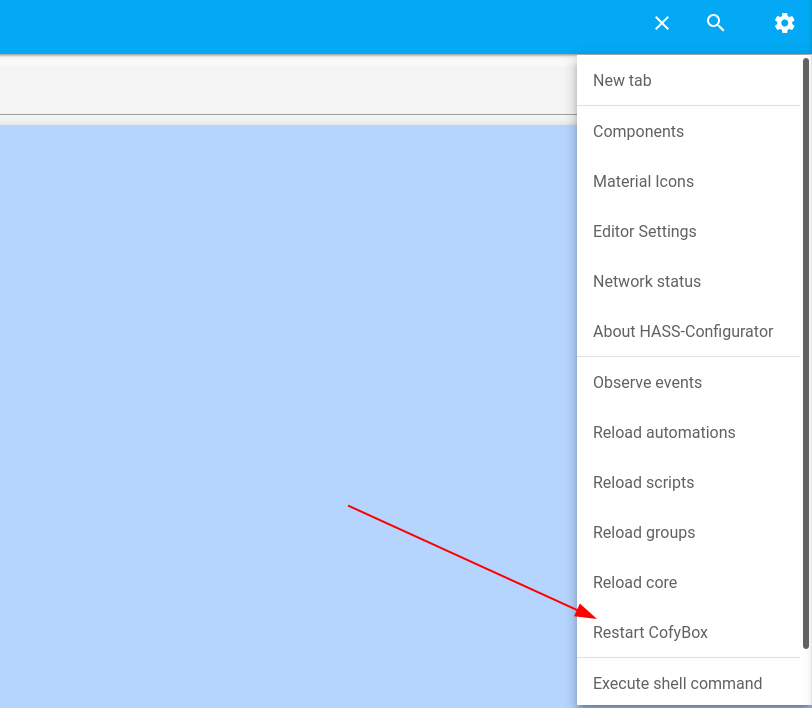
Restart the CoFybox

¶ Checklist
- Connect controller to CoFyBox WiFi network.
- Update firmware (if available).
- Configure MQTT.
- Configure Glue
¶ Troubleshooting
If the ShellyEM fails to connect to the CoFyBox WiFi network it will revert to AP mode.
It is possible to reset the controller but it needs to be removed from the casing. It’s mounted on a DIN rail insert with a cut out for the reset button. This should only normally be done by an electrical installer.